Lion Brand® Wool-Ease®
GAUGE:
22 sts + 28 rows = 4 in. (10 cm) in St st (k on RS, p on WS) with larger needles.
BE SURE TO CHECK YOUR GAUGE. When you match the gauge in a pattern, your project will be the size specified in the pattern and the materials specified in the pattern will be sufficient. If it takes you fewer stitches and rows to make a 4 in. [10 cm] square, try using a smaller size hook or needles; if more stitches and rows, try a larger size hook or needles.
STITCH EXPLANATION:
|
M1 (make 1) An increase worked by lifting horizontal thread lying between needles and placing it onto left needle. Knit this new stitch through the back loop - 1 st increased.
ssk (slip, slip, knit)Slip next 2 sts as if to knit, one at a time, to right needle; insert left needle into fronts of these 2 sts and knit them tog - 1 st decreased.
PATTERN STITCH
K1, p1 Rib (multiple of 2 sts)
Row 1: *K1, p1; rep from * to end of row.
Row 2: K the knit sts and p the purl sts.
Rep Row 2 for K1, p1 Rib.
|
NOTES:
1. Pullover is worked in 4 separate pieces; a Back, a Front, and 2 Sleeves. All pieces begin at the lower edge, then are worked up to the top.
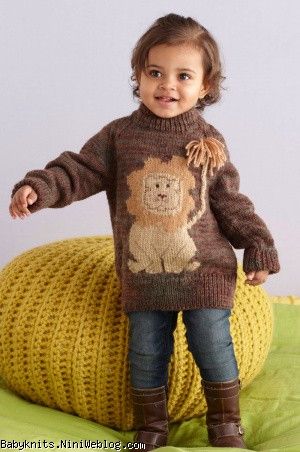
2. The lion is worked in intarsia colorwork on Front, following the Lion Chart. To do intarsia colorwork, use a separate ball of yarn for each color section.
3. When working intarsia colorwork, pick up the strand of the new color from under the strand of the old color to help prevent holes in the knitting.
4. Charts are worked in St st (k on RS, p on WS). To follow the charts, work from right to left on RS rows and from left to right on WS rows
5. Small details are worked in duplicate and embroidered sts, these are indicated on the chart.
6. "ROAR" is worked in duplicate st on the Back of the Pullover, following the Roar Chart.
7. When you see 'work even' in the instructions, this means to continue on in the pattern st you have established without changing the st count by increasing, decreasing, or binding off.
8. When the instructions indicate a number of sts at the end of a row, this tells you how many sts you will have after working that row.
|

BACK
With smaller needles and A, cast on 66 (72, 78) sts.
Work in K1, p1 Rib until piece measures 2 (2 1/2, 2 1/2) in. (5 (6.5, 6.5) cm) from beg.
Change to larger needles.
Work even in St st (k on RS, p on WS) until piece measures 9 (10, 11) in. (23 (25.5, 28) cm) from beg, end with a WS row. Note: End with a WS row means that the last row you work should be a WS row, and the next row that you are ready to work will be a RS row.
Shape Raglan Armholes
Decrease Row (RS): K1, ssk, k to last 3 sts, k2tog, k1 - 64 (70, 76) sts at the end of this row.
Work even in St st for 1 row.
Rep last 2 rows 20 (22, 24) more times - 24 (26, 28) sts when all decreases are complete.
Work even in St st until piece measures 15 (16 1/2, 18) in. (38 (42, 45.5) cm) from beg.
Bind off.
|

FRONT
With smaller needles and A, cast on 66 (72, 78) sts.
Work in K1, p1 Rib until piece measures 2 (2 1/2, 2 1/2) in. (5 (6.5, 6.5) cm) from beg, end with a RS row.
Next Row (WS): (K1, p1) 33 (36, 38) times, m1, (k1, p1) 33 (36, 38) times - 67 (73, 79) sts at the end of this row.
Beg Lion Chart
Change to larger needles.
Row 1 (RS): K16 (19, 22), place marker (pm), work Row 1 of Lion Chart across next 35 sts, pm, k16 (19, 22).
Row 2 (WS): P to marker, slip marker (sm), work Row 2 of Lion Chart, sm, p to end of row.
Work in St st, working Lion Chart between markers, and slipping markers on every row, until piece measures 9 (10, 11) in. (23 (25.5, 28) cm from beg, end with a WS row.
Shape Raglan Armholes
Note: When you have completed Row 65 of Lion Chart, remove markers and work in St st with A only across all sts.
Decrease Row (RS): K1, ssk, k to marker, sm, work Lion Chart, sm, k to last 3 sts, k2tog, k1 - 65 (71, 77) sts at the end of this row.
Next Row (WS): P to marker, sm, work Lion Chart, sm, p to end of row.
Rep last 2 rows until piece measures 13 (14, 15 1/2) in. (33 (35.5, 39.5) cm) from beg, end with a WS row.
Shape Neck
Place a marker on each side of center 13 sts.
Next Row (RS): K to first marker, join a 2nd ball of yarn and bind off next 13 sts, k to end of row.
Work both sides of the Pullover at same time, with a separate ball of yarn for each side.
Next Row (WS): P across sts of both sides.
Next Row: K1, ssk, k to last 3 sts of first side, k2tog, k1; on 2nd side, k1, ssk, k to last 3 sts, k2tog, k1.
Next Row: Purl.
Rep last 2 rows until 2 sts remain on each side.
Work even in St st on both sides until piece measures same as Back.
Bind off.
|

SLEEVES (make 2)
Note: If you like, you can work both Sleeves at the same time. Just use one ball of yarn to cast on 36 (40, 44) sts for one Sleeve, then use another ball of yarn to cast on (onto the same needle) 36 (40, 44) sts for the other Sleeve. Follow the instructions below, knitting each Sleeve with its own ball of yarn.
With smaller needles and A, cast on 36 (40, 44) sts.
Work in K1, p1 Rib until piece measures 2 (2 1/2, 2 1/2) in. (5 (6.5, 6.5) cm) from beg, end with a WS row.
Change to larger needles.
Shape Sleeve
Increase Row (RS): K1, M1, k to last st, M1, k1 - 38 (42, 46) sts at the end of this row.
Work even in St st for 5 rows.
Rep Increase Row - 40 (44, 48) sts at the end of this row.
Rep last 6 rows 6 times - 52 (56, 60) sts when all increases are complete.
Work even in St st until piece measures 9 (11, 12) in. (23 (28, 30.5) cm) from beg.
Shape Raglan Armhole
Decrease Row (RS): K1, ssk, k to last 3 sts, k2tog, k1 - 50 (54, 58) sts at the end of this row.
Work even in St st for 1 row.
Rep last 2 rows 20 (22, 24) more times - 10 sts when all decreases are complete.
Work even in St st until piece measures 15 (17 1/2, 19) in. (38 (44.5, 48.5) cm) from beg.
Bind off.
|
|
FINISHING
With C, following Roar Chart, work duplicate st "ROAR" on lower left of Back, about 1 (2, 2 1/2) in. (2.5 (5, 6.5) cm) in from left side edge.
Following Lion Chart, with dark red, work duplicate st nose; with D, embroider straight st leg and face details.
Tail
Working with 2 double pointed needles, cast on 3 sts. Knit the 3 sts. Do not turn work. *Slide sts to other end of needle and knit them, pulling yarn tightly across the back of the work, (do not turn work); rep from * until cord measures about 7 1/2 in. (19 cm) long. Bind off, leaving a long tail. Following chart for placement, and using yarn tail, sew Tail to Front.
Tail Tassel
Cut 16 strands of C, 3 in. (7.5 cm) long. Fold one strand in half. Insert crochet hook in Front, just above tip of Tail, then into loop of folded strand. Draw loop through. Insert ends of strand into loop and pull to tighten. Rep to attach all strands. Trim ends.
Sew raglan armholes of Sleeves to Back and then to Front. Sew side and Sleeve seams.
Neck Edging
With smaller needles and A, pick up an k82 (86, 90).
Work in K1, p1 Rib for 3 (3 1/2, 3 1/2) in. (7.5 (9, 9) cm). Bind off. Fold top of neck ribbing to inside of neck and sew bind off edge to beg of ribbing.
Weave in ends.


|
 ژاکت شیر





 ژاکت شیر


